Translate

Thursday, November 26, 2015

My first video!!! A shaker card trick - applying foam tape the easy way

Yikies, can you believe I made a video?!? I found this trick on a video by Sandy Allnock, and she seemed surprised at all the comments from people who had no idea to do this. She thought it was common knowledge, well apparently not! Seriously, do you know how many shaker card videos I've watched by all the top names in the paper craft industry, and she is the only one that showed this!!

So for your viewing pleasure (it's 5 minutes long, sorry I tried not to talk too much), here it is:

Sorry about the annoying Kizoa advertisement, it's a free program. It works pretty easy once you get the hang of it, but if you have any suggestions for other online editor programs that are free, please let me know!!

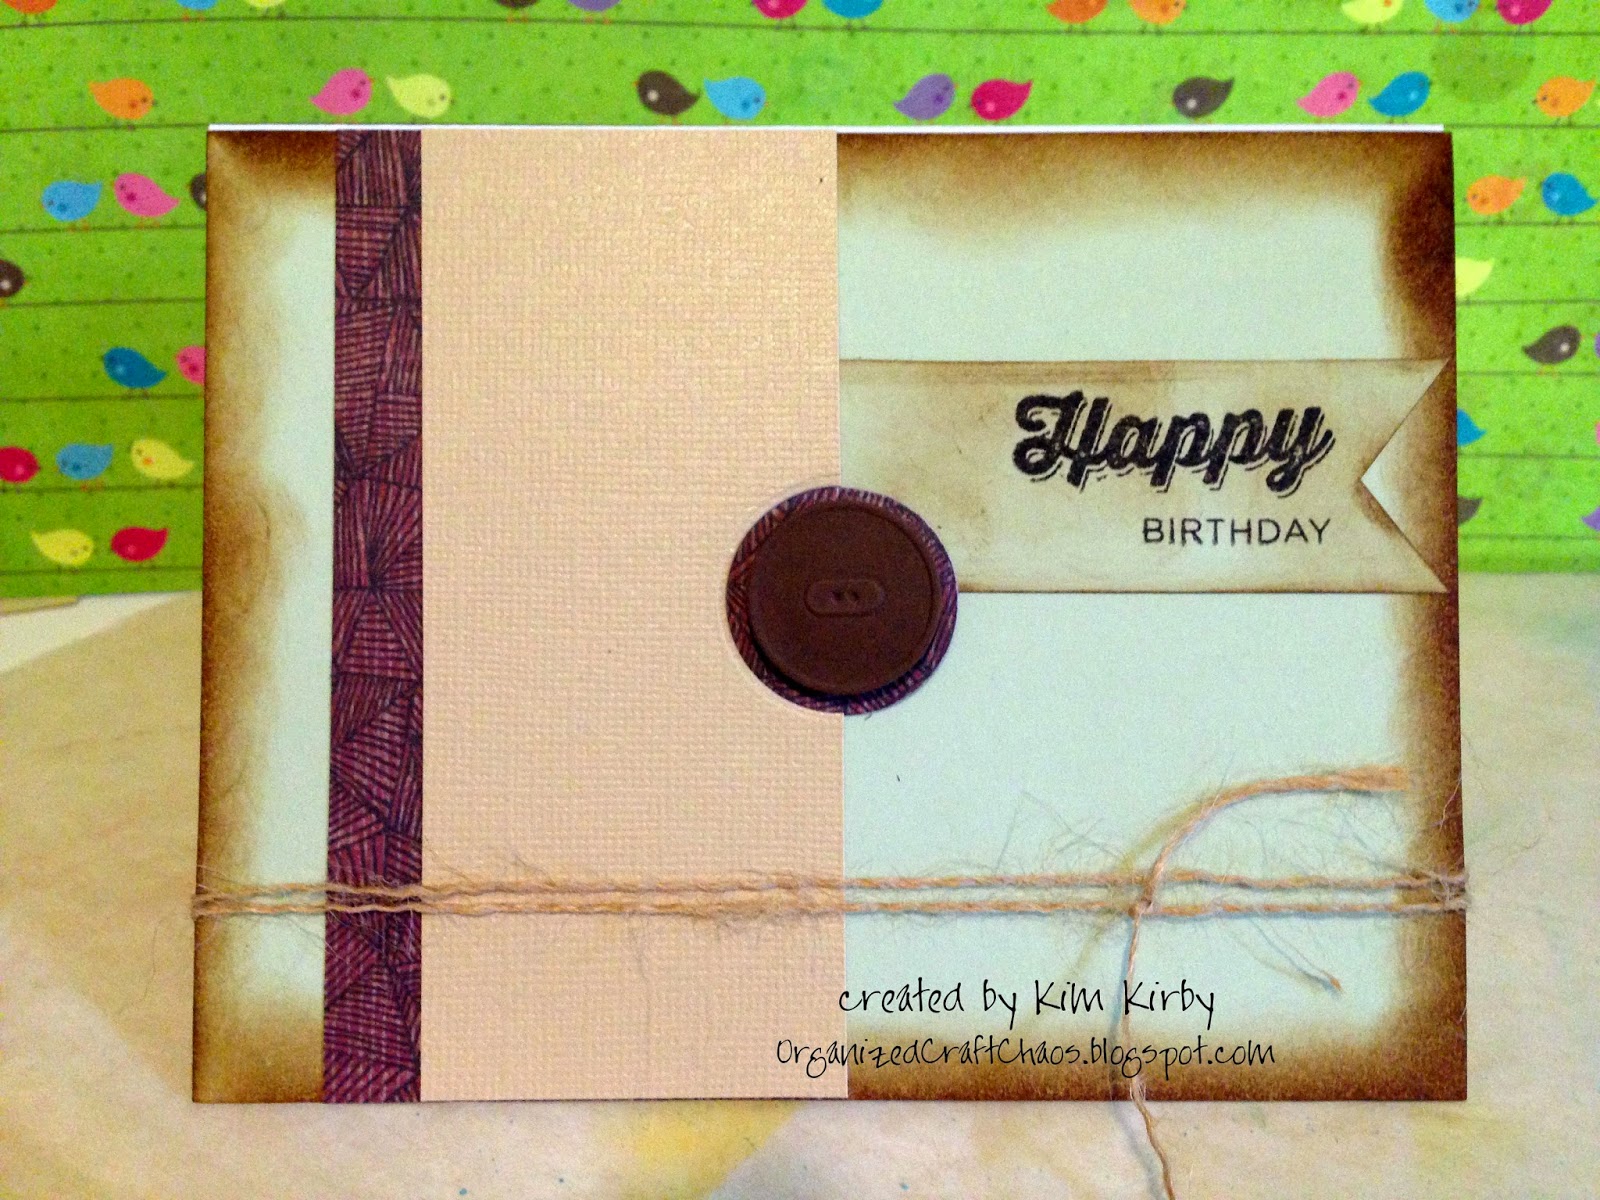
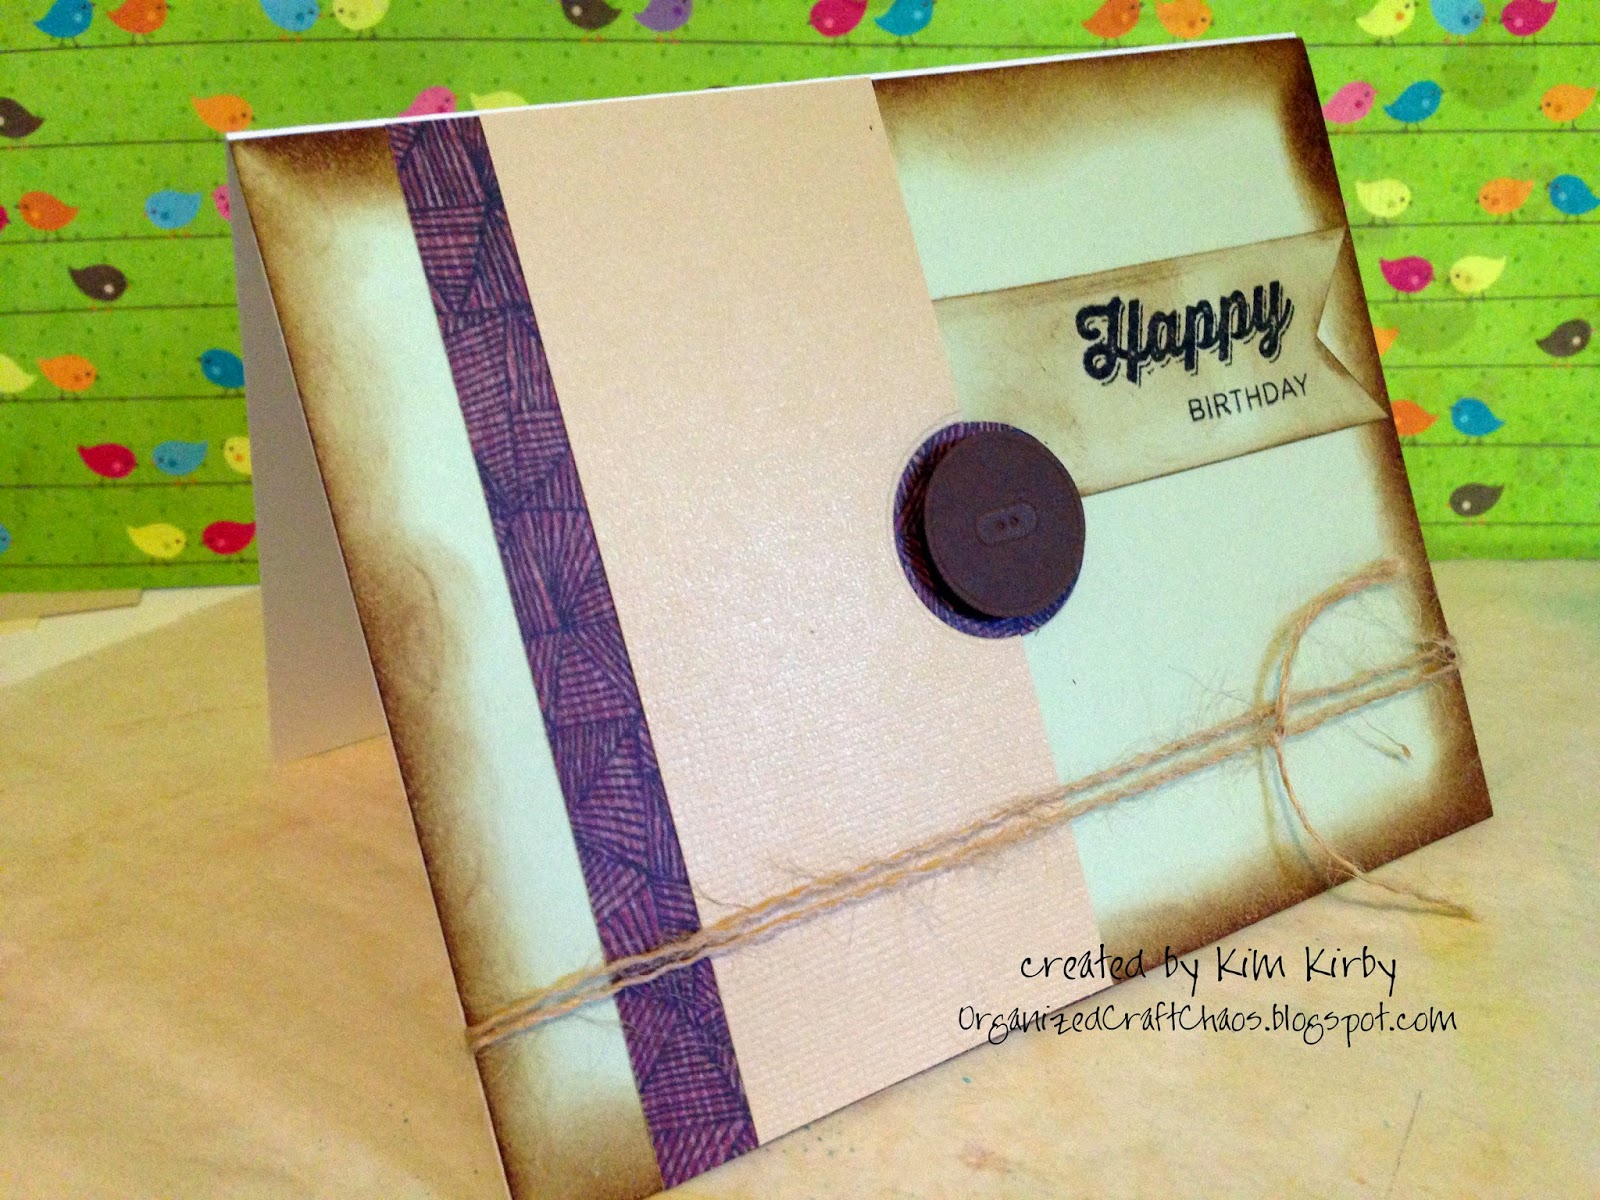
A couple of comments about the cards. First of all, that card isn't truly finished. I haven't even put it onto a card base yet! What I meant is that the shaker part is finished. Also, it seems kind of plain to me. I thought the colorful Christmas bulbs would be enough to 'carry it' but I feel like it's missing something. If you read this within the next couple of days, please feel free to suggest how I can jazz it up without too much overkill. If you've followed my blog at all, you'll know I'm a 'clean and simple' type of person, but my constant challenge is how to add that last little touch that takes it up a notch without overwhelming the look of it.

I truly truly would love to hear your thoughts on my video. Was this a helpful trick? Did you already know to do this, and if so, where did you learn about it? As I said, I saw it in a Sandy Allnock video and she is the only one I've seen do it! And trust me, I have watched a ton of shaker card videos.

If you liked my video, I would love a thumbs up on YouTube. It's easier than commenting but it's also encouragement for me to try to make more. :) Thanks for watching!

Sunday, October 25, 2015

Reindeer Kisses - TCP Tuesday Anything Goes challenge

Do you realize, as of today there are exactly two months left till Christmas?! Are you ready?

I signed up for a shaker card exchange on SplitCoastStampers, and I've been working on some ideas. After a couple of epic fails (like glueing the darned thing closed *before* putting in the shaker bits!!) I finally completed a working prototype. Not sure if I want to make 5 more of these, but I do like the end result. And as it happens, this week is The Cats Pajamas Anything Goes challenge. Since this is from TCP set 'Reindeer Kisses' how perfect did that work out, huh? I haven't played in a TCP challenge for ages, so I think I deserve that part lining up for me... since I spent the weekend working on my failed cards. ;) They were both completely different ideas so maybe this one is meant to be!


I could point out all the glitches, but I won't! It's not like anybody reads my blog to learn stuff so I'm sure I can just keep those things to myself, hehe. I colored in the penguin and reindeer with Copics, and used Tumbled Glass distress ink for the 'sky'. I tried a new-to-me trick for the glitter. I used my clear double sided tape (the tape with the red liner that sticks to your fingers like crazy when you peel it off! lol) and covered it with glitter. Sure enough, once you've shaked and rubbed off the excess glitter, it still looks shiny and glittery but nothing comes off. I love that tape, it's pretty much my favorite adhesive. I just bought two 50 meter rolls for super cheap, I think I'm set for a while now. :)

One of my biggest pet peeves is the photography part. I suck at it. My hands are really shaky so I have a teeny tiny tripod that I use, but it's not very stable so I still need to steady it with my hands. And my camera isn't that great. Honestly, some days I get better pictures with my iPhone! So I'm bummed that you can't see that the sentiment is heat embossed. I used Crimson Red Versafine ink and Judikins clear detail embossing powder. No matter what I tried, I couldn't get the light to catch the gleam of the embossing so it just looks flat in the picture. 

Both the big and little circles were done with the Simon Says Stamp stitched circles. The stitching really takes it up a notch without any extra effort. Really glad I finally bought that set! I just need me some squares... and some rectangles... and, and, and... :D

I hope you're all having fun working on your Christmas cards. I'm not going to start mass producing till my MISTI arrives this week. Super squeeee!

Alright, I'm done for today.

Wednesday, October 14, 2015

I finally bought a water brush!

Today I picked up a Pentel Aquash water brush at Michaels. I've wanted one for a while, but it's always a matter of prioritizing. Couldn't think of any other one thing I wanted to use my 40% off coupon on, so there you have it. Mine mine mine!

That's it, that's all! Maybe I'll post something in the near future that I used it for. :)

Monday, October 5, 2015

A card with more of my Paper Smooches haul, and another Anything Goes challenge!

I'm really in love with all my Paper Smooches stuff, but I specifically bought the Crystal Clear set with shaker cards in mind. I bought the Crystal Clear stamp set, along with the Crystal Clear 1 and 2 die sets which make up the mason jar.

Back a few months ago I won a Bella Blvd prize pack which contained the Rover (dog) and Riley (cat) release. Of course that prize was a match made in heaven. Thank you Bella Blvd!! I was hoarding it... silly me... and decided there was no better time to break out some of the paper than to use with my Paper Smooches mason jar.

Now I have to say, because I don't think I mentioned it last time, Kim Hughes from Paper Smooches really deserves a shout out. She does a new release EVERY month. She must be a crazy lady. ;) On top of that, she is super duper generous and during the design team's release blog hop she gives away several Paper Smooches gift certificates. I was a lucky girl in September and won a GC. I promptly spent it and several dollars more to stock up on some stuff I'd been coveting for awhile. So thank you to Kim for her kindness, I hope it comes back to her a hundred fold. :)

You're gonna think that all I do is go around from blog to blog looking for prizes to win, but I swear I don't! I have to admit I've been pretty lucky, but I also think it's because the stamping/scrapbooking industry is truly one of the most generous out there. I'm starting to have a hard time convincing my husband that I'm actually winning this stuff every time it arrives in the mail. First world problems, right?!!

So back to my card. Here it is:


As mentioned, the paper is Bella Blvd and the jar die and stamp are Paper Smooches. The 'Ruff day'  and bone outline stamps are also Paper Smooches from the 'Paws for a Cause' set, and the other bone stamp (in white) is from the Lucky Dog Two set.

I was looking around online for bone shaped confetti to use in my jar. I didn't really find anything that appealed to me so I thought why not make my own? I stamped the bone outline multiple times on velum, then fussy cut each one out. I used a different bone stamp with Versamark ink and white embossing powder for the three bones you see on the kraft paper. I took three of the vellum bones and strategically glued them on the kraft paper as well. That's a tip I learned from Jennifer McGuire, she usually glues a few sequins directly to the card when she makes a shaker card so that they don't all fall to the bottom. It's much prettier that way. She's one smart cookie! Another tip I learned from her is to use your powder tool (the one you use when heat embossing) on the acetate clear plastic piece to prevent your sequins and other bits from sticking to it. I made my own with cornstarch and a trouser sock and that works just fine too. It's just to remove some of the static.
If you look closely you might even see my reflection in the jar, LOL! Now, here's my own tip for you. Do not do what I did: the card seemed to be curling a bit, so once it was finished I ran it through my die cutter machine (I have a Fiskars Fuse) between the plates just to flatten it out. Bad idea! It smooshed it down too much and the bones stopped moving around as freely as before. Fortunately I followed the 'glue a few' tip and so you see a couple sticking out. :)

I hand cut a banner out of vellum and stamped 'Ruff day?' on it with black pigment ink and used clear embossing powder to give it some texture. You can't really see that because I suck at taking pictures, but it looks nice in person. I felt I couldn't see the sentiment well enough when putting my vellum banner directly on the card, so I cut out a slightly smaller one out of a light kraft cardstock and glued the vellum to it. Then I used some adhesive foam to pop up my banner on the card.


I'm pleased with the overall card. I don't normally add sentiments to my cards because I don't know what I want to use them for but I've realized that when blogging, the cards look more polished by adding a sentiment. By popping it up on foam, I can always swap it out with something else later on. Besides, if you were having a 'ruff day', wouldn't you want a jar full of dog bones?!! ;)

I'm entering my card in the Paper Smooches Sparks Anything Goes challenge again, I love the wide variety of entries we see during the Anything Goes weeks, they're all very inspirational! Already I've spotted a favorite, you have to go check it out! It's a circular card with rainbow colored butterflies, by Dasha in Slovenia, you will love it!

Okay, I think I've carried on enough for one blog post. I hope you enjoyed this card. I'm thinking of tackling a Christmas shaker card next, any suggestions? I'm kinda coveting the new Holiday Lights dies from Paper Smooches' October release... I have a thing for Christmas lights... payday is Friday. Hmmm... LOL.


Monday, September 21, 2015

Paper Smooches Linked Hearts and Anything Goes challenge

I fell in love with this Linked Hearts die the moment I saw it used in a card, so it was a no brainer for me to buy it! It arrived in the mail last week, and I needed to make a quick card to send out with a pendant that a Facebook friend asked that I send on her behalf so I knew right away that I just had to use this die.

This is a super simple card, the die is such a rock star that it doesn't really need anything added to it!


Perfect timing that the Paper Smooches Sparks challenge this week is Anything Goes, dontcha think?!


I wish I had more time for card making, I would love to play with my PS stamps and dies all day. They always put a smile on my face!

This is the pendant that I made and will be sending for my Facebook friend, in case you're curious:
 
Sometimes you just have those 'ah ha!' moments... the Linked Hearts die was one, and the "I Love You to the moon and back" charm was another. I knew immediately that it would be perfect for making Scottie pendants. Here is the original pendant I designed, but since most Scotties are black rather than wheaten (cream), I'm also using the bronze Scottie above until I can get my hands on the perfect black Scottie charms. :)
Scotties and cardmaking. Love them, what can I say!

Sunday, September 6, 2015

My first shaker card... for Kiki

I have a confession to make... I love sequins, and I even sell them in my Etsy shop... but I've never made a shaker card before! I've wanted to, but as you know my cardmaking slowed down to less than a snail's pace after I went back to work in June.

So last month I decided to put together a shaker card on the fly, and I'm just now getting around to posting it on my blog. I like blogging, but when I haven't made cards I don't feel like I have anything to say. I really need to find my groove again, but I'm not going to force it... it'll happen when it happens. :)

Back in July, when at last after over a year without any income at all I had a regular paycheque again and a bit of cash to spare, I splurged and bought a set from Unity Stamp Co. that I had been coveting for a really long time. For my regular readers (though not sure if I still have any since I dropped off the face of the earth!) you'll know that I love dogs more than I love humans, and the loss of a dog hits me harder than anything. Even as I type this I'm sniffling and blinking back a rogue tear or two. So I decided that it would be appropriate for me to use this stamp set for my first shaker card. Here it is:
This isn't a particularly great shot, I just quickly snapped it with my iPhone when I made it a few weeks ago. You may remember my friend Teresa's Kiki... In February we fundraised $5,000 for her chemo treatments. This helped give them half a year more with their beautiful girl. Well, this past week Teresa and her husband came to the realization that it was time to let Kiki go to the Rainbow Bridge (okay the tears are fully flowing now). On Friday September 4th, Teresa and Dave said goodbye to their beautiful 12 year old Kiki. She's been kicking cancer's butt for the last two years, and now it's time for her to rest. This card will be going to them.

Dance and play little girl, you will never be in pain again. ♥

Monday, July 6, 2015

Where did I go?!?

Nowhere really! I wish I'd gone somewhere, how cool would that be?!

I started my new job about a month ago, and it has been sapping a lot of my energy. I am a residential support worker in a transition home for women, I work an overnight shift and I thought it would be perfect for cardmaking since it's usually pretty quiet... but either I have a lot to do, or I find extra stuff to do, lol. The other night, I made a tasty tasty pasta sauce for the worker on swing shifts who prepares the dinner meal everyday. She doesn't like to cook (go figure), and our food budget has been a little out of control because her heart isn't in it... consequently she doesn't always follow the preset menu, and doesn't really try to stretch our food budget dollar. She doesn't really cook veggies other than frozen peas and carrots, so to her a pasta sauce is meat and tomato sauce. In her defense, she's 70 years old and can't afford to retire. She does a lot of the maintenance type stuff (change lightbulbs, etc) so we don't have to do it. She's a really nice lady, and I try to help her out when I can so I offered to chop up and saute some veggies for her, but since I actually like to cook I got carried away and made the whole sauce. It make the night go by fast, I really don't mind. :)

Anyhow... since I haven't been blogging (or commenting on my blog group's posts!) I thought I would make amends by running a small giveaway. Some of you may know I have little Etsy store called The Paper Haberdashery. I sell scrapbooking supplies, mostly just for fun. I could probably jack up my prices but that sucks. When I wasn't working and started getting into cardmaking, I really had to make do with what I had on hand. It seemed like anything I wanted to try I had to buy in too large of quantities for my budget. So that kinda motivated me to offer some basic scrapbooking supplies at low cost. My sequins are a kick ass deal (at least in my opinion!) and you get a really 8 different shades or colors in each pack so you don't get stuck with a whole bunch of just one color. 

I'm in the process of adding a bunch of listings for washi tape that I recently stocked, and I also have more on order though I don't know if it will arrive or be listed before the giveaway ends. You have till the end of July to enter. I don't mean to be a pest, but I highly recommend that you reblog about my giveaway, because I'd like to add a second prize if I get enough visitors/entries. ;) I'm also trying to get some Pinterest followers, hint hint...

I've been thinking of selling enamel dots, I found some wholesale that I like but it'll cost me a minimum of $50 upfront to get a good price on them. I just can't figure out if enamel dots are on their way out yet... it's so hard to keep up with what's popular and what's not! Let me know what you think, I could sure use some advice!

So, good luck to all and if you have any questions just let me know!!

a Rafflecopter giveaway

Sunday, June 14, 2015

Super quick tag for my Secret Sister Swap on Splitcoaststampers

I'm participating in a 'First Aid Kit' Secret Sister Swap on SplitCoastStampers. The idea is that each person provides a list of 10 stamping related items that would heal their 'crafty owies', as well as a list of 5 non-stamping items that the recipient would also like. The swapper creates a 'first aid' kit of a minimum value of $25 (before shipping costs), along with a tag or card identifying themselves, and some fun band-aids.

My 'kit' is all ready to send off, and I realized I hadn't made a card or tag. I put together something small because the space in my package is pretty maxed out already! Here it is:

It says 'Scottitude' at the top because that is my user name on SCS. I feel like I kinda cheaped out on the tag, but I promise the package is amazing! Here's what I included (and everything was on my secret sister's list):

1 pkg of mixed berry Skittles
1 Sudoku book
1 pkg of 15 clear gemstone stickers
a baker's dozen of A2 envelopes
some pearl embellishments
some clear and red rhinestone embellishments
1 pkg of 400 clear adhesive dots by EK Tools
'I Wheelie Like You' stamp set by My Favorite Things
'Swiss Pixie Heidi with Ornament' stamp by C.C. Designs
and 3 stamped C.C. Designs Swiss Pixie images

The moderator is Joan7356 and I think she did an amazing job at matching me up with a secret sister. I adore C.C. Designs stamps, so it was easy for me to stamp some images (which the recipient had requested). I also love pearls and rhinestones and have a ton of those in my stash. We had a lot of similarly listed items, some of which I wasn't able to include unfortunately, but I found that having a secret sister who likes the same stuff as I do made it really easy to put her 'first aid kit' together.

I think my own first aid kit has arrived, I received a notification that a package has arrived so I need to go pick it up. We can't open it till June 17th though, so I will post later this week with what I received.

What is the best or most fun swap you've ever participated in?

Sunday, May 31, 2015

Yeah, I've been MIA... 30-Day Coloring Challenge and a COUPON!!!

Sorry folks, I know it's been awhile. I broke my big toe about 10 days ago, and I've been keeping my foot elevated. I know I could still write in that position, but I find it really awkward. I haven't been crafting either just watching a lot of Netflix, doing some sketching and doodling, and that's about it.
That's me at the hospital, after I got my x-rays confirming it was broken. The ER doctor was just waiting for a consult with the surgeon on call as to whether he thought the break required surgery. All was well though, and they sent me on my way.

It's actually looking really good now, the bruising is almost completely gone. My foot just looks 'dirty'! I'm going to see my family doctor tomorrow morning for a follow-up, but I think it's just a matter of letting it continue to heal. I can already put my full weight on my foot, I just can't fully bend that toe yet so I still have a limp.

If you're wondering how I did this, well it's a little embarrassing. About two hours into an all-day occupational first aid course, I was getting up from the ground and lost my balance. In trying to recover my balance, the toes in my right foot bent backwards at an angle I don't think they're made for! I didn't realize how bad it was until about 7 hours later when I got home and looked at it. I thought it was just sprained, and really needed to get that first aid course done (yes I passed!) I think what aggravated the swelling and bruising was the fact that I was up and down off the ground constantly throughout the rest of the day... cpr and c-spine practice, and bandaging, etc etc.

Anyhow, hope this doesn't gross you out too much, just wanted to post a little update. I'm contemplating participating in the 30-day Coloring Challenge by Kathy Racoosin, from June 1 to 30. You might want to head over to her blog to read up on it. She also has a special coupon code courtesy of Simon Says Stamps for $5.00 off any $5.00 purchase. Yup that's right! Only valid till June 2nd, so head on over there!!

Tuesday, May 5, 2015

More Scottie die-cut notecards

I made these for a fellow Scottie mom, thought I'd get some pictures up. Not staged very well, I just took them with my iPhone real quick.


These were fun and easy to make, using the Scottie from Top Dog Dies 'Dog Days #2'. I gave a bit of an explanation when I first posted a set a couple of months ago: Scottie notecards

If you have any questions though, just leave a comment and I'm happy to provide more info!

Monday, May 4, 2015

We have a winner! Guess who is going to Scrapbook Expo?!

Just a really quick post, no card today. If you're like me, you're dying to find out who won. I often check back giveaways the day after it closes and it's so disappointing when there's no info. So sorry guys, I'm a day late... and a dollar short? Haha, couldn't resist.

Without further ado, the winner is Susan M!! Congrats Susan, I hope you enjoy Scrapbook Expo in Schaumberg IL!
I'll be doing more giveaways in the future, so please consider subscribing to my blog. It auto-posts to Twitter as well if you prefer following me on Twitter. :) I'm setting aside some of the freebies I've won or been given for future giveaways, nothing big since Canada Post is expensive but I want to say thank you to my readers and this seems like a great way to do it. Besides, who doesn't love free stuff!

Since I don't have a card to share, I'll leave you with a picture of a nearby town, White Rock BC (Canada). It was a gorgeous day yesterday and I was out running errands. I made a point of driving down near the beach and thought I'd take a picture or two. The really neat thing that I was unable to capture was that if I looked to the left of there, I could see the beautiful snowy peaks of Mt. Baker, in Washington State. The sight of people walking the beach and even going into the water in their barefeet, with the glacier peaks in the distance was really stunning to me. Hope you all had a lovely weekend too, I'd love to hear what you did in the comment section!


Monday, April 27, 2015

Scrapbook Expo + a GIVEAWAY!!!

Howdy folks! Friday I went to the Scrapbook Expo in Puyallup Washington. I had a good day. There was one disappointment, which I'll talk about in a bit, but overall I would do it again.

I decided to volunteer at the Expo, and I met some really nice fellow volunteers. The Scrapbook Expo staff are also very kind. In the morning, I volunteered at Will Call. The biggest thing I learned was: Don't come between a scrapbooker and her scrapbooking! =D  Overall, most people were happy and excited to be there. No matter where you go or what you do, you'll run into a Grumpy Gus or two. I've done enough volunteer work in my life to know that it comes with the job. I'm sure they'll never know I'm blogging about them, but a shout out to a couple of Scrapbook Expo employees, Jerry and Sam. Also, a shout out to my fellow volunteers, Diana and Michelle. Everybody was so kind and patient, even when I got into "Miss Bossy Boots" mode a little bit too much. ;) Have I ever mentioned I'm an anal-retentive, obsessive compulsive perfectionist? LOL.

Because Puyallup is over three hours from my home, I had left around 3:30 in the morning to be there for my 7:30 am shift. By the time I was done at 11:30 am, I was pretty tired since aside from a nap the day before, I didn't sleep at all Thursday night. After grabbing myself a yummy Fisher's scone from their booth at the fairgrounds, I went out to my car and had myself a nice little nap so I could enjoy the rest of the day.

The one thing I really really really wanted to do was the Make & Take at the Fun Stamper's Journey booth. They are a pretty new direct sales business in the paper craft industry. If it was open to Canadians, I probably would have signed up with them, instead of Close To My Heart (sorry CTMH, I still love you!) for the simple reason that they sell steel metal dies as opposed to CTMH who sells Cricut, which I don't own. I was excited to try out their product, they've been touting their new 'hybrid' inks which I really really wanted to try. Also, they were giving out a free stamp set to all participants. That's pretty sweet! I wanted it so bad, since I can't get it or try it up here without spending money first via an American consultant who has offered to ship to me. Now for the disappointing part. By approximately 3:30 in the afternoon, they had run out of supplies and had to shut their booth down. Apparently they had been short-shipped, and were expecting to have more the following day. Sadly for me, I couldn't afford to stay overnight, and it was just too big of a trip to go back on Saturday. I won't lie, I thought I was going to cry. I was still running on not much sleep and my emotions tend to come to the surface when I haven't slept properly. I basically just had to walk away, because seeing a grown woman cry is just not a pretty sight, and I didn't want to inflict that on anybody. I had hoped they'd at least have their stuff out for people to visit after the last Make & Take, but they literally packed everything up. I guess they figured it was easier to close their booth than to placate angry scrapbookers. I can't say I blame them, but by the same token it left a yucky taste in my mouth. Oh well.

One super fun thing I did was go the Creativity Center. Scrapbook Expo hosts an all-day continuous Make & Take showcasing a ton of different products. When I got there, they were going to die-cut and emboss a Tim Holtz Alterations butterfly out of plastic, and use Ranger Adirondack alcohol inks to give it some color. That was really appealing to me, since I've wanted to play around with those. Shout out to Scrapbook Expo staffer Lorraine for being such a great instructor, and her volunteer Rita who was very diligent in making sure we had the stuff we needed.
For those who've never used alcohol inks before, you squeeze out a drop or two on the felt bottom of the applicator, and dab it on the item you want to colorize. Because alcohol ink dries instantly and is permanent, this was perfect for using on plastic.

You can't really see it in the photo, but the matte was white cardstock, and I grabbed some Gelatos to play around with in matching colors. I rubbed them on a scrap piece of paper, and then rubbed them lightly onto the matte. I thought it was subtle but added a nice touch.
The show floor closed at 6 pm, and I had signed up to volunteer again at the Crop and Make & Take Extravaganza in the evening. My shift was from 8:30 till 12:30 (yes that's half past midnight! I'm a crazy gal, what can I say?!)

I spent about 40 minutes trying to decide where to eat, when I found out that Puyallup had been visited by Guy Fieri from Dinners, Drive-Ins, and Dives on the Food Network. Hubby and I love that show and we've always wanted to check out some of the spots he has showcased. The place in Puyallup was called Crockett's Public House. Not much to look at from the outside, but the service was great and the food was fantastic! There was a 40 minute wait, so I sat at the bar instead. I was happy to see that one of Guy Fieri's showcased meals was one that I really wanted to eat, Mom's Sloppy Joe, and dang was it amazing!!! It had just the right amount of heat. The hand cut fries were yummy, and the homemade ranch dressing was a nice cooling effect from the sloppy joe's heat.

I ate every last bite of that sloppy joe, I just couldn't bear to leave any behind! When I was done, I headed back over to Scrapbook Expo for my volunteer shift. I was assigned to work in the 'Tool Shed', and my fellow volunteer was Rita, the same lady who'd been helping at the Creativity Center earlier. This was a pretty good gig, I got a chance to get up close and personal with a lot of stuff I'd never used before. They had a half dozen or so different die cutters and embossers, everything from the Ebosser to the Cuttlebug. They had a ton of Spellbinders dies, some Sizzix dies, and also some Little B dies which I'd been wanting to check out for some time. They also had four Canon Selphy photo printers that allowed you to print directly from your phone! They had a bunch punches, as well as We R Memory Makers Lucky 8 punches and Mini 8 punches. They had a ginormous binder full of embossing folders, and a ton of stencils as well. Last but not least, they had all of the We R Memory Makers punch boards. It was a lot of fun working with Rita, I think we were a great team, and between the two of us we knew how pretty much everything worked!

Finally midnight rolled around and the last of the scrapbookers had gone home, or back to their hotel rooms. We did a little clean up, which was very minimal since we'd been keeping it clean the whole evening, and then we were done!

All in all, it was a good day. I learned some new tips and tricks, saw some new stuff, figured out what I would do different next year. If I volunteer again, I'd want to sign up for a later shift, I would love to be in the Creativity Center because you're helping with one Make & Take after another, how much better can it get?! I'd also probably sign up for the evening Extravaganza, I think they got their money's worth with the amount of Make & Takes they were given... even though I'm not keen on cropping if it requires packing up my entire craft room on a wagon! LOL. I'd probably want to take some classes too. In hindsight, the Copics class, coloring on glitter would have been really cool. It just wasn't in the cards this year, since I didn't have a lot of money to spare.

Anyhow, down to the reason you're probably here: a giveaway! Thanks to my diligent volunteer work, I earned two free admissions to ANY Scrapbook Expo in ANY city in 2015! Puyallup was the nearest one to me, I'd have to fly to go to any other one. So I figured, why keep these two admissions just to go to waste, why not share them with my readers?! There are a bunch of ways you can enter the draw, see Rafflecopter below for more info.

San Diego, CA May 29–30
Chantilly, VA June 12–13
Akron, OH June 26-27 *NEW SHOW*
Kansas City, MO July 10-11 *NEW SHOW*
Duluth, GA July 17–18
St. Paul, MN July 24–25
Santa Clara, CA Aug. 7–8
Schaumburg, IL Aug. 21–22 *NEW VENUE*
Somerset, NJ Sep. 11–12
Marlborough, MA Sep. 18–19 *NEW SHOW*
Mesa, AZ Sep. 25–26
Denver, CO Oct. 2–3
Sacramento, CA Oct. 16–17
Ontario, CA Oct. 23–24

Please note that this giveaway is NOT sponsored by Scrapbook Expo. They gave me free tickets for volunteering, and I in turn am giving them away. I am not affiliated with any of the companies or products listed above, all links are provided as a courtesy to my readers, and I do not receive any compensation or product for anything on my blog.


Thursday, April 23, 2015

Clara's 3rd birthday

This week, Tuesday to be precise, was my niece Clara's 3rd birthday. The big party is tomorrow, the theme is Disney princesses and will feature a real live princess! On Tuesday however, we had just family for dinner, so I gave Clara her bday card then.

I really love this little image, you'll have seen it a few days ago when I posted my practice one. It is by C.C. Designs, and it's called Swiss Pixies Birthday Gretel. I had so much fun coloring it! I'm also entering it in the C.C. Designs CAS sketch challenge.

I still have to figure out this whole photo thing, as you can see the colors are different between the two pictures. Granted, I was in a hurry, I was already late and almost forgot to take pictures! The top picture was after I remembered to open the blinds to get some natural light, so those colors are truer to the real deal I think.

Monday, April 20, 2015

Cat's Birthday - 2015

Today is my baby sister Cat's birthday, she turned 29! This is the card I made for her:

I was a little short on time after making her birthday cupcakes last night (of course I'm a procrastinator) and was lacking inspiration, so I used the C.C. Designs April challenge sketch, I just flipped it horizontally.
If you saw my last post, you'll have seen the cute C.C. Designs Swiss Pixie Birthday Gretel that I colored as a practice run for my niece Clara's birthday... that's tomorrow! I had initially intended to use this sketch for my niece, along with Birthday Gretel, and enter that one in the challenge. I suppose I could use the same design just flip it another direction perhaps.

Saturday, April 18, 2015

CC Designs Swiss Pixie Birthday Gretel

I've fallen in love with some of CC Designs stamps, particularly the Swiss Pixie ones. I only have two of their stamps so far, but I'm always on the lookout when people are destashing on SplitCoast!

I spent the day Thursday crafting with two of my sisters in Vancouver, making decorations for my niece's 3rd birthday party. Truth is, I sat at my die cutting machine and cranked out circles... all... afternoon... long... but it was still fun! I think I must have cut 150-200 circles! When I was getting ready to leave, one of my sister's disappeared and reappeared with a ziploc bag full of Copic markers. She said she didn't have time for art anymore, and did I want them. Did I want them? Did I want them?? HECK YEAH! I think there were about a couple dozen, mostly Sketch with a handful of Ciaos, and there were only 3 that I had already (not including a colorless blender, but you can never have too many, right?)

Anyhow, I sat down with my newest CC Designs stamp tonight (last night? It's 3 am, lol) and decided to color it and hopefully use it for my niece's birthday card. I don't have any Memento Tuxedo Black ink yet, which I desperately need to buy... so I used Versafine Onyx black. I didn't heat set it, but I let it sit for 24 hours, but it still bled. Booo. Oh well, it really was a practice run anyhow.

So here is the end result. I'm pretty pleased, considering this is only my 2nd attempt at coloring with alcohol markers. And I'm not really artistic in that sense to begin with, so I feel like I have a lot of catching up to do, compared to others who have been coloring/painting/drawing their whole lives, you know?
I was looking for inspiration to color it, and I found a neat video tutorial for the balloons, using this very stamp! I think I did a pretty good job with the balloons, the video showed how to make them 'see through'.

One of the big challenges for me was figuring out the color scheme. Although I now have a good selection in some color families, others I have pretty much nothing. I have zero yellow Copics, and just one Shin Han Touch. I also don't really have any greens, just one Copic Ciao and one Shin Han Touch.

I applied some Perfect Pearls on the wings, and I think the shimmer is perfect for them. I was worried about the candle at first, it was looking too dingy grey, but I think I fixed it okay.

As always, I love feedback so please, positive and not-so-positive is welcome. :)

Thursday, April 16, 2015

Um... Thank You? - TCPTUES288

Just a real quick post which I may come back and edit... I just feel as though if I don't post now, it could be awhile! ;)


I made this card for TCPTUES288 - The Cat's Pajamas Color Challenge: Saffron Celery Tangerine. This was good for me, helped me to step out of my color comfort zone!
http://thecatspajamasrs.com/TCP/tcp-tuesday-tcptues288-color-challenge/

I had some great Bo Bunny paper, and I used The Cat's Pajamas 'Official Grinch' stamp set.
I don't know how visible it is, but I used some Glossy Accents on some of the smaller 'bubbles' that were in the challenge colors. I was tempted to put Glossy Accents on Sprinkle The Cat's eyes... but I thought that might be just a little spooky when it's not even Halloween, lol!
 
The 'Official Grinch' set was released during Winter 2014 as a Christmas set, but it's fantastic and can be used all year round. Although it's spring time, it's still cold in a lot of places, so I loved that Sprinkle is bundled up in the um, tacky oversized sweater somebody lovingly gifted her. ;) I can't even recommend this stamp set enough, it was first on my list during that release!
http://thecatspajamasrs.com/TCP/product/official-grinch/


Tuesday, April 14, 2015

All Scotties Go To Heaven

There isn't much to say about this card, I think it speaks for itself. The stamp is from The Cat's Pajamas, it's a retired set which I've been chasing down from the moment I saw Poochie with wings. It's a Valentine's set, but that particular stamp has a whole different meaning for me. I hope that Alma doesn't mind the context that I've used it in, especially since I made this card with a lot of love and reverence for all the tears my friends and I have shed for our beautiful lost Scotties. Again today there was sad news. Right after I made this card I learned that Shamus, my friend Julie's boy is nearing the end of his battle with cancer. He was diagnosed with Transitional Cell Carcinoma (TCC) just a few short months after they lost Doughall, one of their other boys, to TCC also. TCC is canine bladder cancer, but it has now gone into his bones. I don't want this card to be for Shamus. I don't want it to be for any of our babies really. I just hope that it will bring comfort to whoever ends up being the recipient.


The 'rainbow' paper was hand colored using distress inks. It represents the Rainbow Bridge. 

I'm entering this card in The Cat's Pajamas' Spring Blog Hop. A little last minute, but I've been planning this card for weeks... just had to get some other cards done first. :) I'm also entering it in the Simon Says Stamps Monday Challenge: In the Middle. The middle is the center... and Scotties are the center of my life. I wish that cancer wasn't a part of that, but it will always be right there at the center too...

Monday, April 13, 2015

SplitCoastStampers - Canadian Card Swap

I recently participated in a card swap via SplitCoastStampers. It was a 7+1, meaning I'm sending 7 cards, and the +1 is the one I keep for myself. I thought I'd clarify, since that always confuses me... maybe there are others like me out there, haha.

I decided to make a masculine birthday card. I think generally speaking cardmakers struggle with masculine cards, and I thought it would be nice for people to have one on hand. It was also a good opportunity to use the Jackson paper from Close To My Heart's Seasonal Expressions which just came out on April 1st. I really don't do much in those colors (lots of browns, some teal, etc) so this was perfect. This is what I came up with.


The Jackson paper is the brown patterned stripe towards the left side of my card (bottom in the paper packet picture below). You can see it under the button in the middle as well.


The big strip of beige-y colored stuff is Core'dinations, the rest is just plain old Recollections that I had on hand. 

The stamp is also from a new CTMH set, super versatile, it's called Finding the Words (D1646).

The button is from an old Sizzix Embosslit, and the twine is literally from some burlap I bought last fall. I just pulled out a few 'threads' to use. :) Oh and the distress ink is Vintage Photo. That was the first color of distress ink I bought, and I don't regret one bit. I use it all the time!

A couple of the swap ladies are local to me, one of them being the organizer, so we met up at a Starbucks and swapped cards. It was lovely meeting them both for the first time. We agreed we should get together more often, card swap or not!

Thursday, March 19, 2015

Scottie notecards

It's been awhile... I was procrastinating a set of notecards for a Scottie gift exchange. I don't know why, it's just in my nature? I felt guilty about making anything else till the notecards were done, so I haven't made anything!

I wanted to make something simple, a basic blank notecard. Several weeks ago I was playing with my distress inks and made what hubby referred to as 'cotton candy looking' paper. :) When I first received my Top Dog Dies 'Dog Days #2' set in the mail, I used that 'cotton candy' paper to die cut a bunch of Scottie dogs, just for fun. Today I decided to use my Top Dog Dies Scottie die to die cut a negative shape into the notecards. I then used some glue dots to glue the 'cotton candy' Scottie die cuts to the inside of the cards, so that it would pop through the Scottie 'window.

I don't know if I'm explaining myself very well, but as they say, a picture is worth a thousand words. So here are my pictures. :)


The colors also fit in really well with the SplitCoastStampers Free For All 'baby pinks and blues' challenge.